

how to fix audio delay
FIX: Audio latency in Windows 10
Aleksandar's main passion is technology. With a solid writing background, he is determined to bring the bleeding edge to the common user. With a keen eye, he always spots the next big thing surrounding... Read more
Updated: Posted: February 2019
- The Windows 10 audio latency problem is especially annoying when you're trying to watch a movie.
- Learn how to fix audio delay problems by running the Sound troubleshooter.
- A great idea is to check the sound driver that is known to cause this problem.
- Another important solution is to prevent any apps from taking exclusive control over the sound.
XINSTALL BY CLICKING THE DOWNLOAD FILE
The proper sound output shouldn't be something we should break our back for. But, even though Windows 10, with every iteration, brings in something new, the essentials are seemingly suffering.
A lot of users report audio lagging in Windows 10, falling behind the video. This audio lag in Windows 10 completely ruins the playback experience so we made sure to show you how to fix the audio lag below.
How can I fix audio lag in Windows 10?
- Run the Sound troubleshooter
- Reinstall Realtek audio driver or replace it with a generic driver
- Disable Hardware Acceleration and Exclusive applications priority
- Restore Playback device to defaults
- Change the Audio format and disable Enhancements
- Disable ErP and/or HPET in BIOS
- Install the Flash player if the problem occurs in a browser
- Change Power plan to High Performance
- Update Windows or uninstall updates
- Reinstall Windows
1. Run the Sound troubleshooter
- Right-click Start and open Settings.
- Choose Update & Security.
- Select Troubleshoot from the left pane.
- Expand the Playing Audio troubleshooter and click Run the troubleshooter.
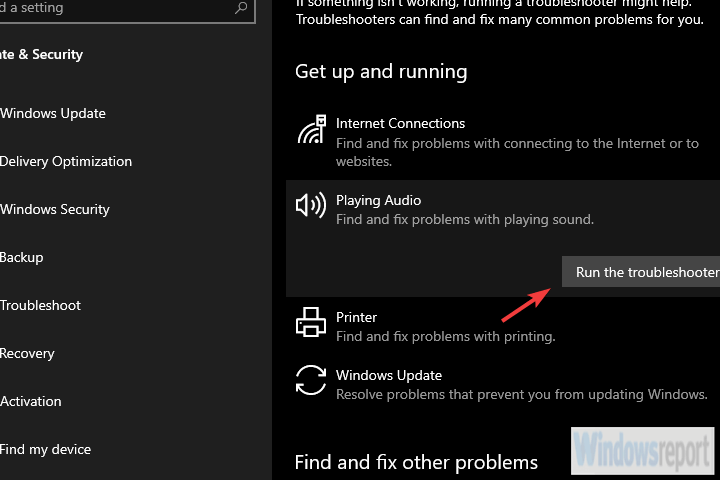
Let's start by running the built-in Sound troubleshooter. Windows 10 comes with a set of dedicated troubleshooters and one of those deals with audio issues.
This includes playback issues so many users experience, like sound distortion, delay, or even complete absence of the system sound.
Once run, the troubleshooter should either deal with the problem or, at least, show you what's causing audio lag.
2. Reinstall Realtek audio driver or replace it with a generic driver
- Right-click Start and open Device Manager.
- Expand the Sound, video, and game controllers section.
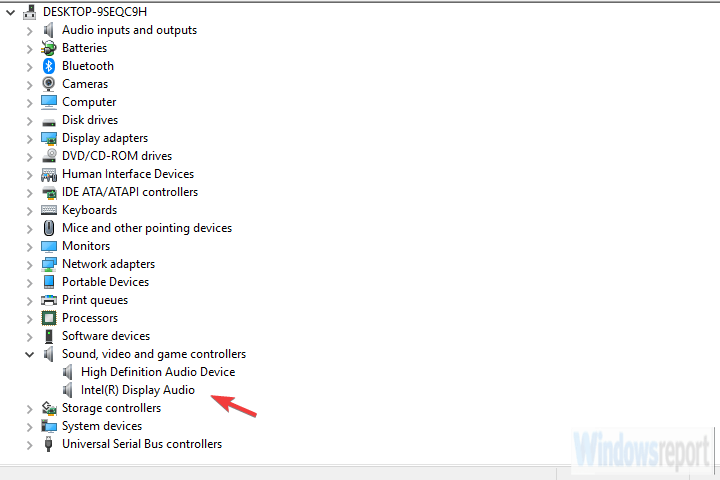
- Right-click on the Realtek/Intel sound driver and uninstall it.
- Restart your PC and the driver should install automatically.
The majority of sound issues start with a bad set of drivers. And there are so many possible combinations so we can't say with certainty what's exactly the issue. Some users resolved issues with driver reinstallation.
Others, completely remove the Realtek onboard sound driver and stick with the generic Windows driver (High Definition Audio Device).
Finally, the third group uses a manual approach for installing an official Realtek driver. We suggest trying all 3 and looking for improvements.
Also, in case you're using USB headphones, make sure to download the proper driver. The generic driver provided by Windows won't work most of the time.
And you can find the official sound driver on the Realtek website.
The easiest solution that we recommend is to use a dedicated driver updater program that will automatically search for drivers and update them for you safely and fast.
Some of the most common Windows errors and bugs are a result of old or incompatible drivers. The lack of an up-to-date system can lead to lag, system errors or even BSoDs. To avoid these types of problems, you can use an automatic tool that will find, download, and install the right driver version on your Windows PC in just a couple of clicks, and we strongly recommend DriverFix. Here's how to do it:
- Download and install DriverFix.
- Launch the application.
- Wait for DriverFix to detect all your faulty drivers.
- The software will now show you all the drivers that have issues, and you just need to select the ones you'd liked fixed.
- Wait for DriverFix to download and install the newest drivers.
- Restart your PC for the changes to take effect.

DriverFix
Drivers will no longer create any problems if you download and use this powerful software today.
Disclaimer: this program needs to be upgraded from the free version in order to perform some specific actions.
3. Disable Exclusive control and Exclusive applications priority
- Right-click the Sound icon in the Notification area and open Sounds.
- Select the Playback tab.
- Right-click on your default playback device and open Properties.
- Choose the Advanced tab.
- Under the Exclusive mode, uncheck both Allow applications to take exclusive control of this device and Give exclusive mode applications priority boxes.
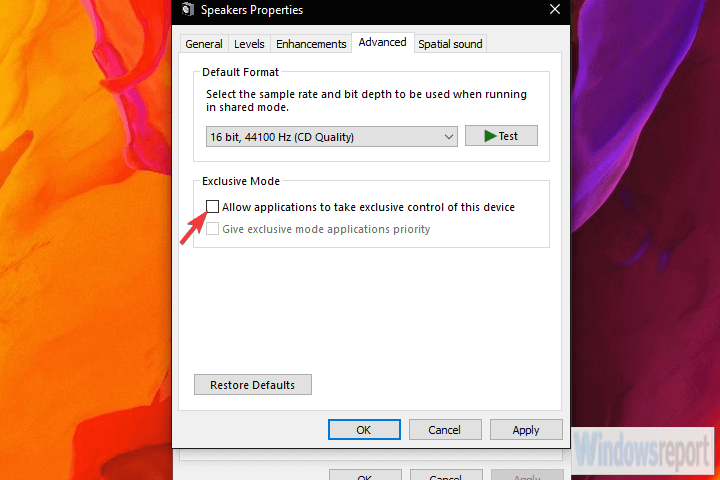
- Save changes and exit.
There are a dozen built-in options that allow you to tweak sound controls. For the sake of troubleshooting the audio lag issue, we'll start by disabling two of them. Those are Exclusive control and Exclusive applications priority.
Once off, some users have seen improvements. Exclusive prioritizes program's sound settings over system ones, while Exclusive applications priority to reduce sound latency for a variety of applications.
For some reason, both seem to cause audio lag for some users.
4. Restore Playback device to defaults
- Right-click Sound icon in the Notification area and open Sounds.
- Select the Playback tab.
- Right-click on your default playback device and open Properties.
- Under Enhancements and Advanced tabs, click Restore Defaults.
- Save changes.
If you've recently made some changes to your default playback device (speakers or headphones), try restoring it to default values. If you're not sure what you've tweaked, restoring all values to factory should do the job.
Finally, if you're still experiencing issues afterward, continue with the steps above.
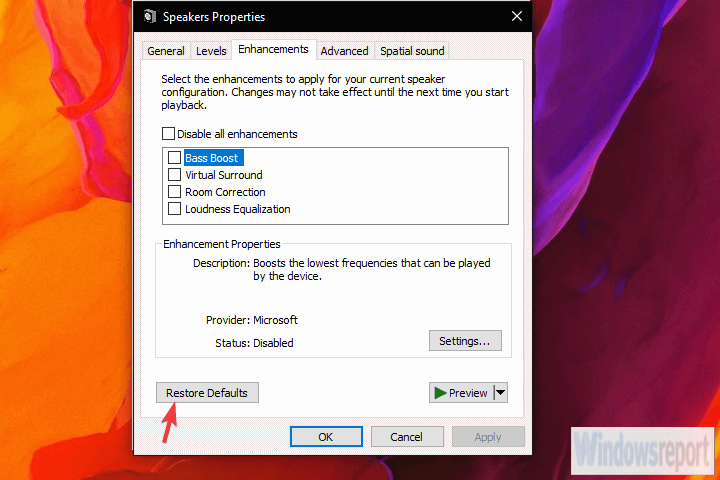
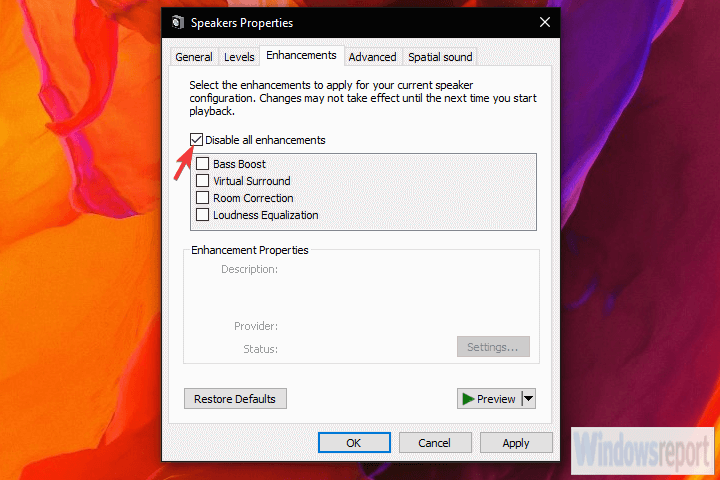
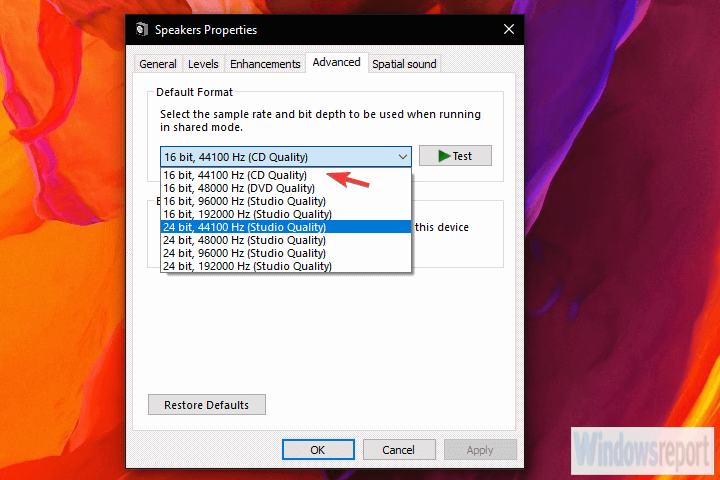
5. Change the audio format and disable enhancements
- Right-click the Sound icon in the Notification area and open Sounds,open the Playback tab, right-click on your default device, and open Properties.
- Under theEnhancements tab, check the Disable all enhancements box.
- Now, under the Advanced tab, change the current default audio format to CD or DVD quality. The bitrate values are under the contextual menu.
- Save changes and restart your PC.
In the previous step, we explained how to restore defaults. However, that might not help and there are still some things you can change to, hopefully, reduce or even completely fix audio lag or latency.
Expert Tip: Some PC issues are hard to tackle, especially when it comes to corrupted repositories or missing Windows files. If you are having troubles fixing an error, your system may be partially broken. We recommend installing Restoro, a tool that will scan your machine and identify what the fault is.
Click here to download and start repairing.
The two remaining options in Sound settings worth considering are Audio format and Enhancements. The first option, Default audio format, might be running on a too high sample rate quality.
The latter option, Enhancements, should be completely disabled.
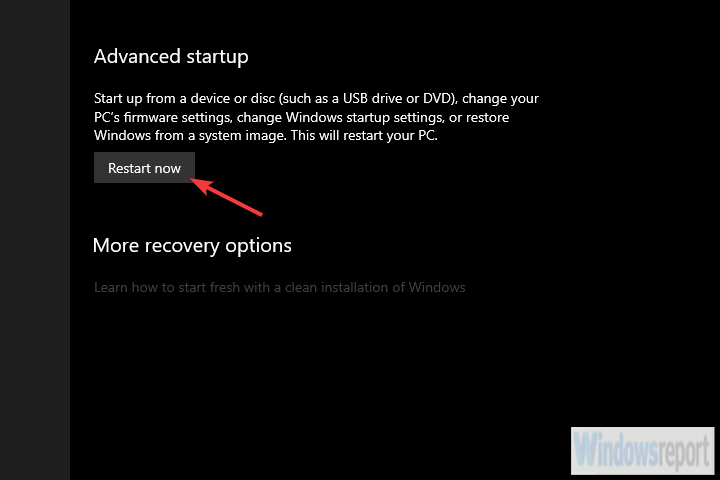
6. Disable ErP and/or HPET in BIOS
- Press Windows key + I to open Settings.
- Choose Update & Security.
- Select Recovery from the left pane.
- Under the Advanced startup, clickRestart now.
- Choose Troubleshoot.
- Select Advanced options.
- Choose UEFI Firmware Settings and clickRestart.
- Once there, disable ErP or HPET and save changes.
- Exit and reboot your PC.
If the previous system-based changes haven't helped you, we need to move to UEFI/BIOS settings. Another two options you need to disable in order to fix the audio lag.
Hardly both options will be available in settings, but if there's no ErP, HPET usually is and vice versa.
Just boot into BIOS and disable ErP/HPET and, hopefully, the playback audio lag shouldn't bother you anymore. If you're not sure how to boot into BIOS on Windows 10, follow the steps above.
7. Install the Flash player if the problem occurs in a browser

Nowadays, most browsers don't require Flash player installation in order to successfully stream media. They usually come with a preinstalled flash player and everything should work as intended from the get-go.
Except, for some users, it doesn't. What we suggest in that case is to either switch to an alternative browser or install Adobe Flash Player.
Either way, the browser-related audio lag, latency, and similar playback issues are usually resolved that way. Also, don't forget to disable the Hardware Acceleration under the browser settings menu.
8. Change Power plan to High Performance
- Right-click on the Battery icon and open Power Options.
- Select the High-Performance plan from the list.
- If it's not available, click on the Create a power plan link in the left pane.
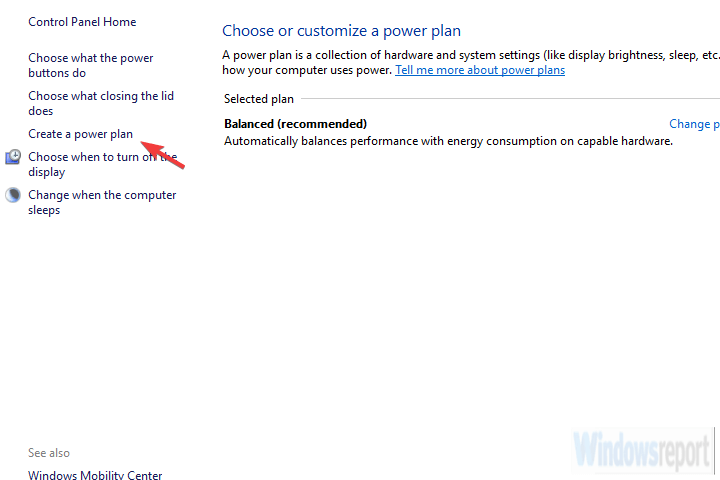
- Choose High performance and name the plan.
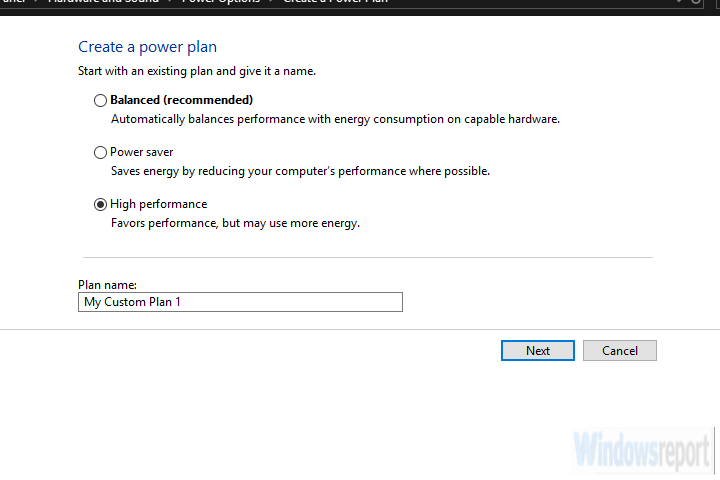
- Click Next, select preferred settings, and click Create.
- Set it as your default plan and look for changes.
Another possible reason for the audio lag in Windows 10 is the set of advanced power-saving options which kick in if you use Power Saving or even Balanced mode.
What we want to do is switch to a High-Performance plan and stick with it.
That way, nothing no power-saving options would affect the audio playback. This applies to laptops mostly, but you can follow it through on desktop PCs as well.
9. Update Windows or uninstall updates
- Press Windows key + I to open Settings.
- Choose Update & Security.
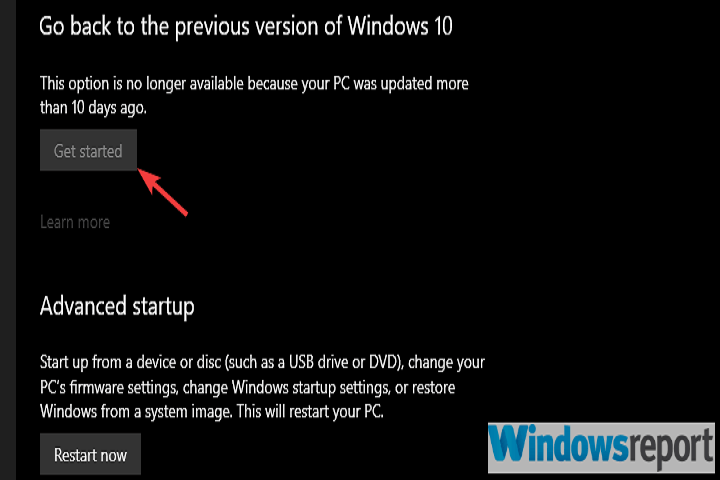
- Select Recovery from the left pane.
- Click Get started under the Go back to the previous version of Windows 10 section.
Windows 10 is sometimes just breaking itself, without any foreign impact. Enforced updates are, as many of us have experienced, sometimes starting issues instead of fixing them.
Every transition to a next major update bears the risk of emerging issues. And, in this case, some users who have had perfect sound output on earlier Windows 10 iterations, suddenly run into a debilitating audio lag after an update.
What we suggest is to update Windows firstly. Yes, Microsoft usually needs some time to fix bugs on an unpolished major update. If that doesn't help, consider rolling back to a previous release.
10. Reinstall Windows
Finally, if none of the steps helped, the only remaining thing which falls on my mind is a clean reinstallation. This, of course, doesn't have to be a solution, as there are so many additional factors in play.
However, you'll at least remove the system as a possible culprit for the audio lag.
If you don't know how to do it, we have an excellent guide on how to reinstall Windows 10 that will get you through with it.
And, with that said, we can wrap it up. Don't forget to share your thoughts in the comments section below. If you have an alternative solution or question, consider sharing them with us and our readers.
Frequently Asked Questions
-
There are many reasons for this problem but we have an excellent guide that will help you fix it.
-
The most common cause for the audio glitching is the audio driver. Here's a list with the best driver updating software to fix this problem.
![]()
Newsletter
how to fix audio delay
Source: https://windowsreport.com/audio-lagging/
Posted by: torreshics1945.blogspot.com
0 Response to "how to fix audio delay"
Post a Comment